

3D Embroidery Patches: The Complete Guide to the Bold, Pop-Out Look
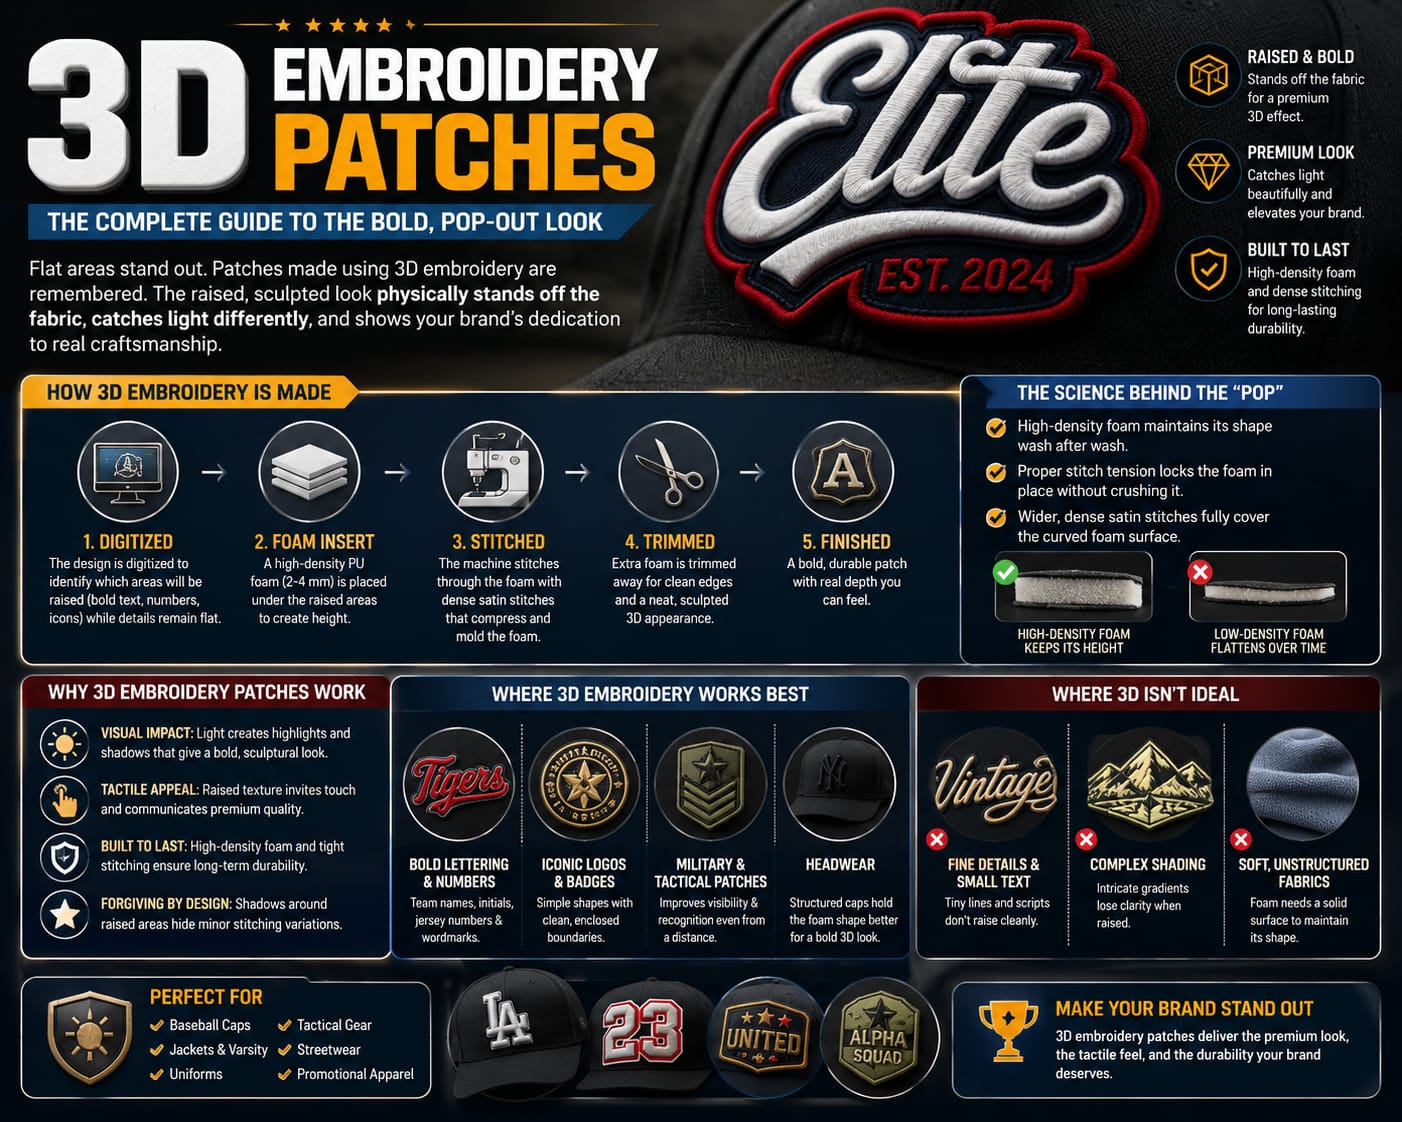
Flat areas stand out. Patches made using 3D embroidery are remembered. The raised, sculpted lettering on baseball caps, military unit patches, and high-end streetwear continues to appear on the most expensive products for a reason: it physically stands off the fabric, catches light differently than anything flat could, and indicates that a brand put genuine craftsmanship into the details. This book delves deeply into the definition of 3D embroidery, its construction, and the appropriate time to use it for your personalized patches.
What Is 3D Embroidery, Really?
“3D embroidery” (also known as raised embroidery, puff embroidery, or 3D puff patches) is not a distinct type of thread or machine. It’s a construction method applied on top of regular needlework. A foam insert is positioned beneath particular portions of the design before the embroidery machine stitches over it, as opposed to stitching thread flat on a twill backing.
The steps that distinguish 3D embroidery from standard flat embroidery are as follows:
The digitizer first identifies the areas of the artwork that will be raised, usually bold text, numbers, or basic graphic forms, while the finer background details remain flat. Under the elevated areas, a sheet of high-density polyurethane foam, typically 2 to 4 mm thick, is cut or positioned. Then, using closely spaced satin stitches that compress and mold the foam as they travel, the embroidery machine stitches straight through the foam and base cloth. A neat, sculpted, three-dimensional letter or form sits proudly on the patch surface after extra foam surrounding the stitched edges is cut away.
The end product is a patch with real physical depth that you can feel with your fingers rather than an illusion produced by shading or thread density.
The Material Science Behind the “Pop”
Foam density and thread tension are the two main factors that cause 3D embroidery to maintain its shape over time.
Cheaper “puff” patches frequently seem flat after a season because lower-density foam contracts too easily and loses its elevated profile after repeated washing or heat exposure. When paired with properly adjusted stitch tension, higher-density polyurethane foam maintains its structure after many years of use. This is also the reason why the digitization of 3D embroidery differs from that of flat embroidery: the stitch density must be sufficiently tight to completely compress and lock the foam in place without breaking it, but not so thick that the patch becomes too rigid.
The choice of thread is also important. The majority of 3D embroidery uses the same rayon or polyester threads as regular custom embroidered patches, but satin stitch columns must be wider and more densely packed to completely cover the curved surface of the foam without leaving any visible gaps because the thread is stitching over a raised foam base rather than flat fabric.
Why 3D Embroidery Patches Are So Effective
From every angle, a flat patch interprets its design in the same way. The way light strikes a 3D patch causes it to shift; highlights capture the upper borders, shadows form around the base of raised letters, and the entire design takes on a sculptural character that reads and looks better in person than any flat alternative. This visual weight instantly translates into brand presence for initials, logos, and brief bold text.
Additionally, flat embroidery just cannot provide a tactile component. Premium headgear manufacturers and military unit patches mainly rely on raised embroidery because 3D text on caps, patches, and jackets encourages touch, which confirms perceived quality.
Lastly, compared to flat work, 3D embroidery is superior at hiding little stitching flaws. Small variations in stitch alignment are far less noticeable than they would be on a fully level surface because the foam naturally casts shadow lines along the margins of raised regions.
Where 3D Embroidery Patches Work Best
Raised foam structure is not always advantageous. It works best on:
The traditional use of bold lettering and numerals, particularly on structured hats and varsity-style coats, includes team names, initials, jersey-style numbers, and brief wordmarks.
Foam requires a clear barrier to compress against, thus simple logo shapes like icons, badges, and emblem-style logos with crisp, enclosed boundaries work well.
Military and tactical unit patches: Because the elevated profile improves visibility and recognition at a glance, even from a distance or in poor light, many unit insignia use 3D puff embroidery.
Headwear: Because the solid crown panel better maintains the foam’s shape than soft, unstructured fabric, structural baseball caps and trucker hats are the most popular applications.
Fine detail is where 3D stitching falters. Intricate shading, tiny lines, and small script typefaces just cannot be raised neatly; anything too delicate should remain flat since the foam needs sufficient surface area to compress uniformly. For this reason, the majority of real-world 3D patches mix flat stitched details (background text, fine linework) with elevated primary features (letters, a brand icon) in a single design to provide contrast and legibility.
3D Embroidery vs. Flat Embroidery vs. Other Raised Patch Types
It’s worth being clear about where 3D embroidery sits relative to other patch materials, since several types can look “raised” for very different reasons.
Standard flat embroidered patches rely purely on thread density and stitch direction for texture — there’s no foam involved, and the surface stays essentially level. 3D embroidery adds genuine physical height through the foam-insert process described above.
PVC patches also have a raised, dimensional look, but for a completely different reason — they’re molded from liquid rubber into a metal die, not stitched at all. PVC gives a smoother, glossier raised surface and full waterproofing, while 3D embroidery keeps the soft, textile feel of thread and is not inherently water-resistant.
Chenille patches achieve their raised, plush look through tufted yarn rather than foam-backed satin stitching, giving a fuzzier, more casual texture that suits varsity and streetwear styles rather than the crisp, structured look of 3D puff embroidery.
Each of these techniques creates dimension in its own way, and picking the right one comes down to the look, feel, and durability your project actually needs.
Design Tips for 3D Embroidery Patches
Maintain bold, enclosing elevated pieces. Foam is uniformly compressed and held in place by thick block letters, straightforward icons, and crisp contours.
Restrict the elevated space to the design’s main focal point. The patch is readable while maintaining the pop-out effect where it counts most when a flat embroidered background detail is combined with a 3D primary logo or writing.
Select different thread colors for the flat and raised portions. This enhances the 3D element’s visibility and aids the eye in distinguishing between the two textures.
Think about the base outfit. The shape of 3D embroidery is much better supported by structured caps and strong jacket panels than by soft, elastic materials, which over time may bend and distort the foam.
Care and Durability
When made correctly, 3D embroidered patches withstand regular wear and tear, but a few behaviors prolong their lifespan. Avoid ironing elevated parts directly with high heat as this can permanently soften and flatten the foam. For clothing with extensive 3D embroidery, spot cleaning is typically safer than machine washing. Additionally, the profile is preserved for years when caps or jackets are stored without crushing the raised parts, as opposed to piling bulky objects on top.
What Affects the Price of 3D Embroidery Patches
Knowing why 3D embroidery usually costs more than regular flat stitching aids in setting reasonable project budget expectations. The larger factor is digitizing time; determining precisely which parts of a pattern should be raised, at what height, and with what stitch density takes significantly longer than digitizing a flat image. The foam insert itself adds a material cost that flat patches do not. Because the embroidery machine must stitch thru both foam and fabric with tighter tension control, which lengthens the machine time each patch, production likewise proceeds more slowly.
Complexity of design also matters. It is simple to create a single bold logo or brief wordmark with a single elevated part. In order to prevent distortion, a design that combines several raised features at varying heights or blends big raised regions with small flat detail needs to be digitized more carefully and produced more slowly. Since the digitizing and setup costs are a one-time expense spread over the entire order, the cost per unit decreases dramatically in bigger quantities, as is the case with most custom patchwork.
Although the choice of backing technique—iron-on, Velcro, or sew-on—has less of an effect on cost, it is still important to make a decision early on since it may have an impact on how the finished patch is finished and trimmed around the elevated areas.
Getting 3D Embroidery Patches Made
Producing quality 3D embroidery requires the digitizing expertise to know exactly which parts of a design should be raised, the right foam density for the application, and precise stitch tension control to lock everything in place cleanly. At USA Patches, our team handles that entire process in-house as part of our custom embroidered patches service, including:
Free digital mockups before production begins, so you can see exactly how the raised design will look.
Low minimum order quantities, whether you need a handful of samples or a full production run.
Color and thread matching support for combined raised-and-flat designs.
Fast turnaround with bulk pricing available on larger orders.
If you’re ready to give your logo or lettering real physical presence, browse our Embroidered Patches collection, check out Patch Samples to feel the difference between flat and raised construction firsthand, or request a free custom quote to start your 3D patch project.